I've been sharpening my saws for several years now. And while I get the crosscut saws to cut well, I usually get some uneven teeth, so I know the saws can probably perform better. In this post, I describe how I had more success. In these first pictures, the saw is held a couple of inches above a piece of white paper and a light (the dark, curved feature at the top of these photos is a lamp) is reflecting off the paper. This really gets the teeth to show up well.
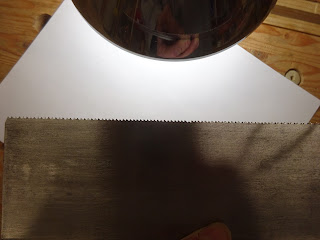 |
At first glance, the teeth look fine ...
|
 |
... but look closer and you see shallow gullets ...
|
 |
... and one tooth that is way shorter than the rest
|
There were also some spacing issues - some gullets were wider than others, making the distances from the tooth points irregular.
I've found that, just as with woodworking, a careful, structured approach is what works for me. Don't rush it and get it right. First up is to joint the teeth so there is a flat on EVERY tooth. That means I had to remove enough metal to get down to the level of that short tooth.
 |
My sawtooth jointing file holder
|
 |
Filing the tops
|
 |
Unequal size of flats indicates irregularly shaped teeth
|
So to do the sharpening, I first marked the shallow gullets and did some filing there to get them a little more even with the rest.
 |
Marking the shallow gullets (look at that one second from the left!)
|
Then I used a paper template for the proper tooth spacing. It's stuck to the plate with a little double sided tape applicator that my wife uses for scrapbooking. It applies small dots of adhesive that are perfect for this!
 |
12 tpi template taped to plate
|
Then I got to sharpening. In the past, I'd give 2-3 stokes of the file in every other gullet, turn the saw around and use 2-3 strokes in the other gullets. And I'd always get "cows and calves", even when I just removed the flats. This time, I made a single stroke with the file and checked the flats. Then made another single stroke in each gullet and checked the flats. I worked carefully to sneak up on removing the flats, while keeping the points lined up with the template.
 |
Looks pretty good
|
And here's the result. The gullet depth and tooth spacing is not perfect, but it's much better.
 |
Final result looks very good
|
One last thing here. Most of what I've read about sharpening crosscut saws says to file every other gullet from one side, then turn the saw around and file the remaining gullets from the other side. I didn't do that this time. I saw a video of an old shipwright sharpening a crosscut saw all from one side. I thought I'd give it a try and it is far more efficient. With my old method, turning the saw around to switch sides means unclamping and turning my whole saw vise around. Then I have to change my file to another position in the file holding / alignment jig. Filing every gullet from the same side speeds up the process immensely. And I have not noticed any difference in the quality of the filing or of the resulting cut.


